Building a Visual Workflow Engine (Part 3): AI Nodes, Tool Use & Public Workflows

How AI nodes invoke LLMs, how tool use turns workflows into agents by letting AI call other nodes as tools, and how workflows get published as APIs, web forms, and templates.
Part 1 covered the visual editor — React Flow, the node registry, and how workflows compile to JSON. Part 2 covered the execution engine — the while-loop, parallel branches, pause/resume, and real-time streaming. This post covers the layer that turns a workflow engine into an AI agent framework.
The key insight is simple: when you give an AI node access to other nodes in the same workflow as callable tools, the workflow stops being a static pipeline. The AI decides which tools to call, in what order, based on the input. The graph defines what the agent can do. The AI decides what it should do.
We also cover the distribution layer — how workflows get published as versioned APIs, embeddable web forms, and reusable templates.
The AI node architecture
All AI-powered nodes share a base class that handles the LLM invocation pipeline.
// packages/lib/src/workflow-engine/processors/base-ai-node.ts

abstract class BaseAiNodeProcessor {
  protected orchestrator: LLMOrchestrator
  protected usageTracking: UsageTrackingService

  async executeNode(node, context): Promise<NodeResult> {
    // 1. build messages (subclass implements)
    const messages = await this.buildMessages(node, context)

    // 2. invoke LLM via orchestrator
    const response = await this.invokeOrchestrator(messages, config)

    // 3. handle response (subclass implements)
    return this.handleResponse(response, node, context)
  }
}
This is a template method pattern. BaseAiNodeProcessor defines the skeleton: build messages → call LLM → handle response. Subclasses implement buildMessages() and handleResponse(). The orchestrator invocation — including provider selection, quota checks, and usage tracking — is shared.
The LLMOrchestrator (covered in our multi-provider AI system series) handles provider routing. The processor doesnt know which LLM provider its calling — OpenAI, Anthropic, Google, Groq. The orchestrator selects the provider based on the model config, enforces credit quotas via UsageTrackingService, and normalizes the response format. Every invocation is tracked: tokens used, model, provider, cost.
Three node types extend this base: AIProcessorV2 (the primary AI node), TextClassifierProcessor, and InformationExtractorProcessor. Same LLM infrastructure, different output contracts.
AIProcessorV2 — the primary AI node
This is the node most workflow authors interact with. It supports multi-turn prompt templates, file attachments, structured output, and tool use.
// packages/lib/src/workflow-engine/processors/ai-v2.ts

interface PromptTemplate {
  role: 'system' | 'user' | 'assistant'
  content: string   // supports {{variablePath}} interpolation
}

// the config supports:
// - prompt_template[] (multi-turn) or legacy prompt/systemPrompt
// - file attachments as multi-modal content
// - structured output via JSON schema enforcement
// - tool use (other workflow nodes as callable tools)
// - LLM parameters: temperature, max_tokens, top_p, reasoning_effort
Variable interpolation
Any variable in the execution context can be referenced in prompt templates using {{variablePath}} syntax. {{customer.name}}, {{findNode.output.email}}, {{env.COMPANY_TONE}} — all resolved during preprocessing.
This means missing variables are caught before the LLM call. If a prompt references {{previousNode.output}} but that node hasnt run (maybe its on a different branch), the preprocessor throws a WorkflowNodeProcessingError with a clear message. The user sees "fix your node" in the editor, not a cryptic LLM error about empty messages.
File attachments
The AI node can receive files from upstream nodes (file upload triggers, document extractors) and send them as multi-modal content to the LLM.
// simplified — the actual resolution is more involved
async resolveFileAttachments(node, context): Promise<MessageContent[]> {
  const fileRefs = this.getFileReferences(node.data.config)

  return Promise.all(fileRefs.map(async (ref) => {
    const file = await context.resolveFile(ref)

    // check if the selected model supports this file type
    if (!LLMClient.isSupportedFileMimeType(file.mimeType, modelId)) {
      throw new WorkflowNodeConfigurationError(
        `Model ${modelId} does not support ${file.mimeType} files`
      )
    }

    return { type: 'image', data: file.base64, mimeType: file.mimeType }
  }))
}
A typical pattern: receive a file upload → extract text with the document extractor node → send the file + extracted text to an AI node for analysis. The multi-modal support means the AI can see the visual layout of a PDF or image, not just the extracted text.
Structured output
When enabled, the AI node enforces a JSON schema on the LLM response. The schema is defined in the node config, and the LLM is instructed (via provider-specific mechanisms like OpenAIs response_format or Anthropics tool-use schema trick) to return conforming JSON.
This makes AI node outputs reliably parseable by downstream nodes. If the next node is a crud node that creates a record, it can reference {{aiNode.output.customerName}} and know the field exists and is the right type.
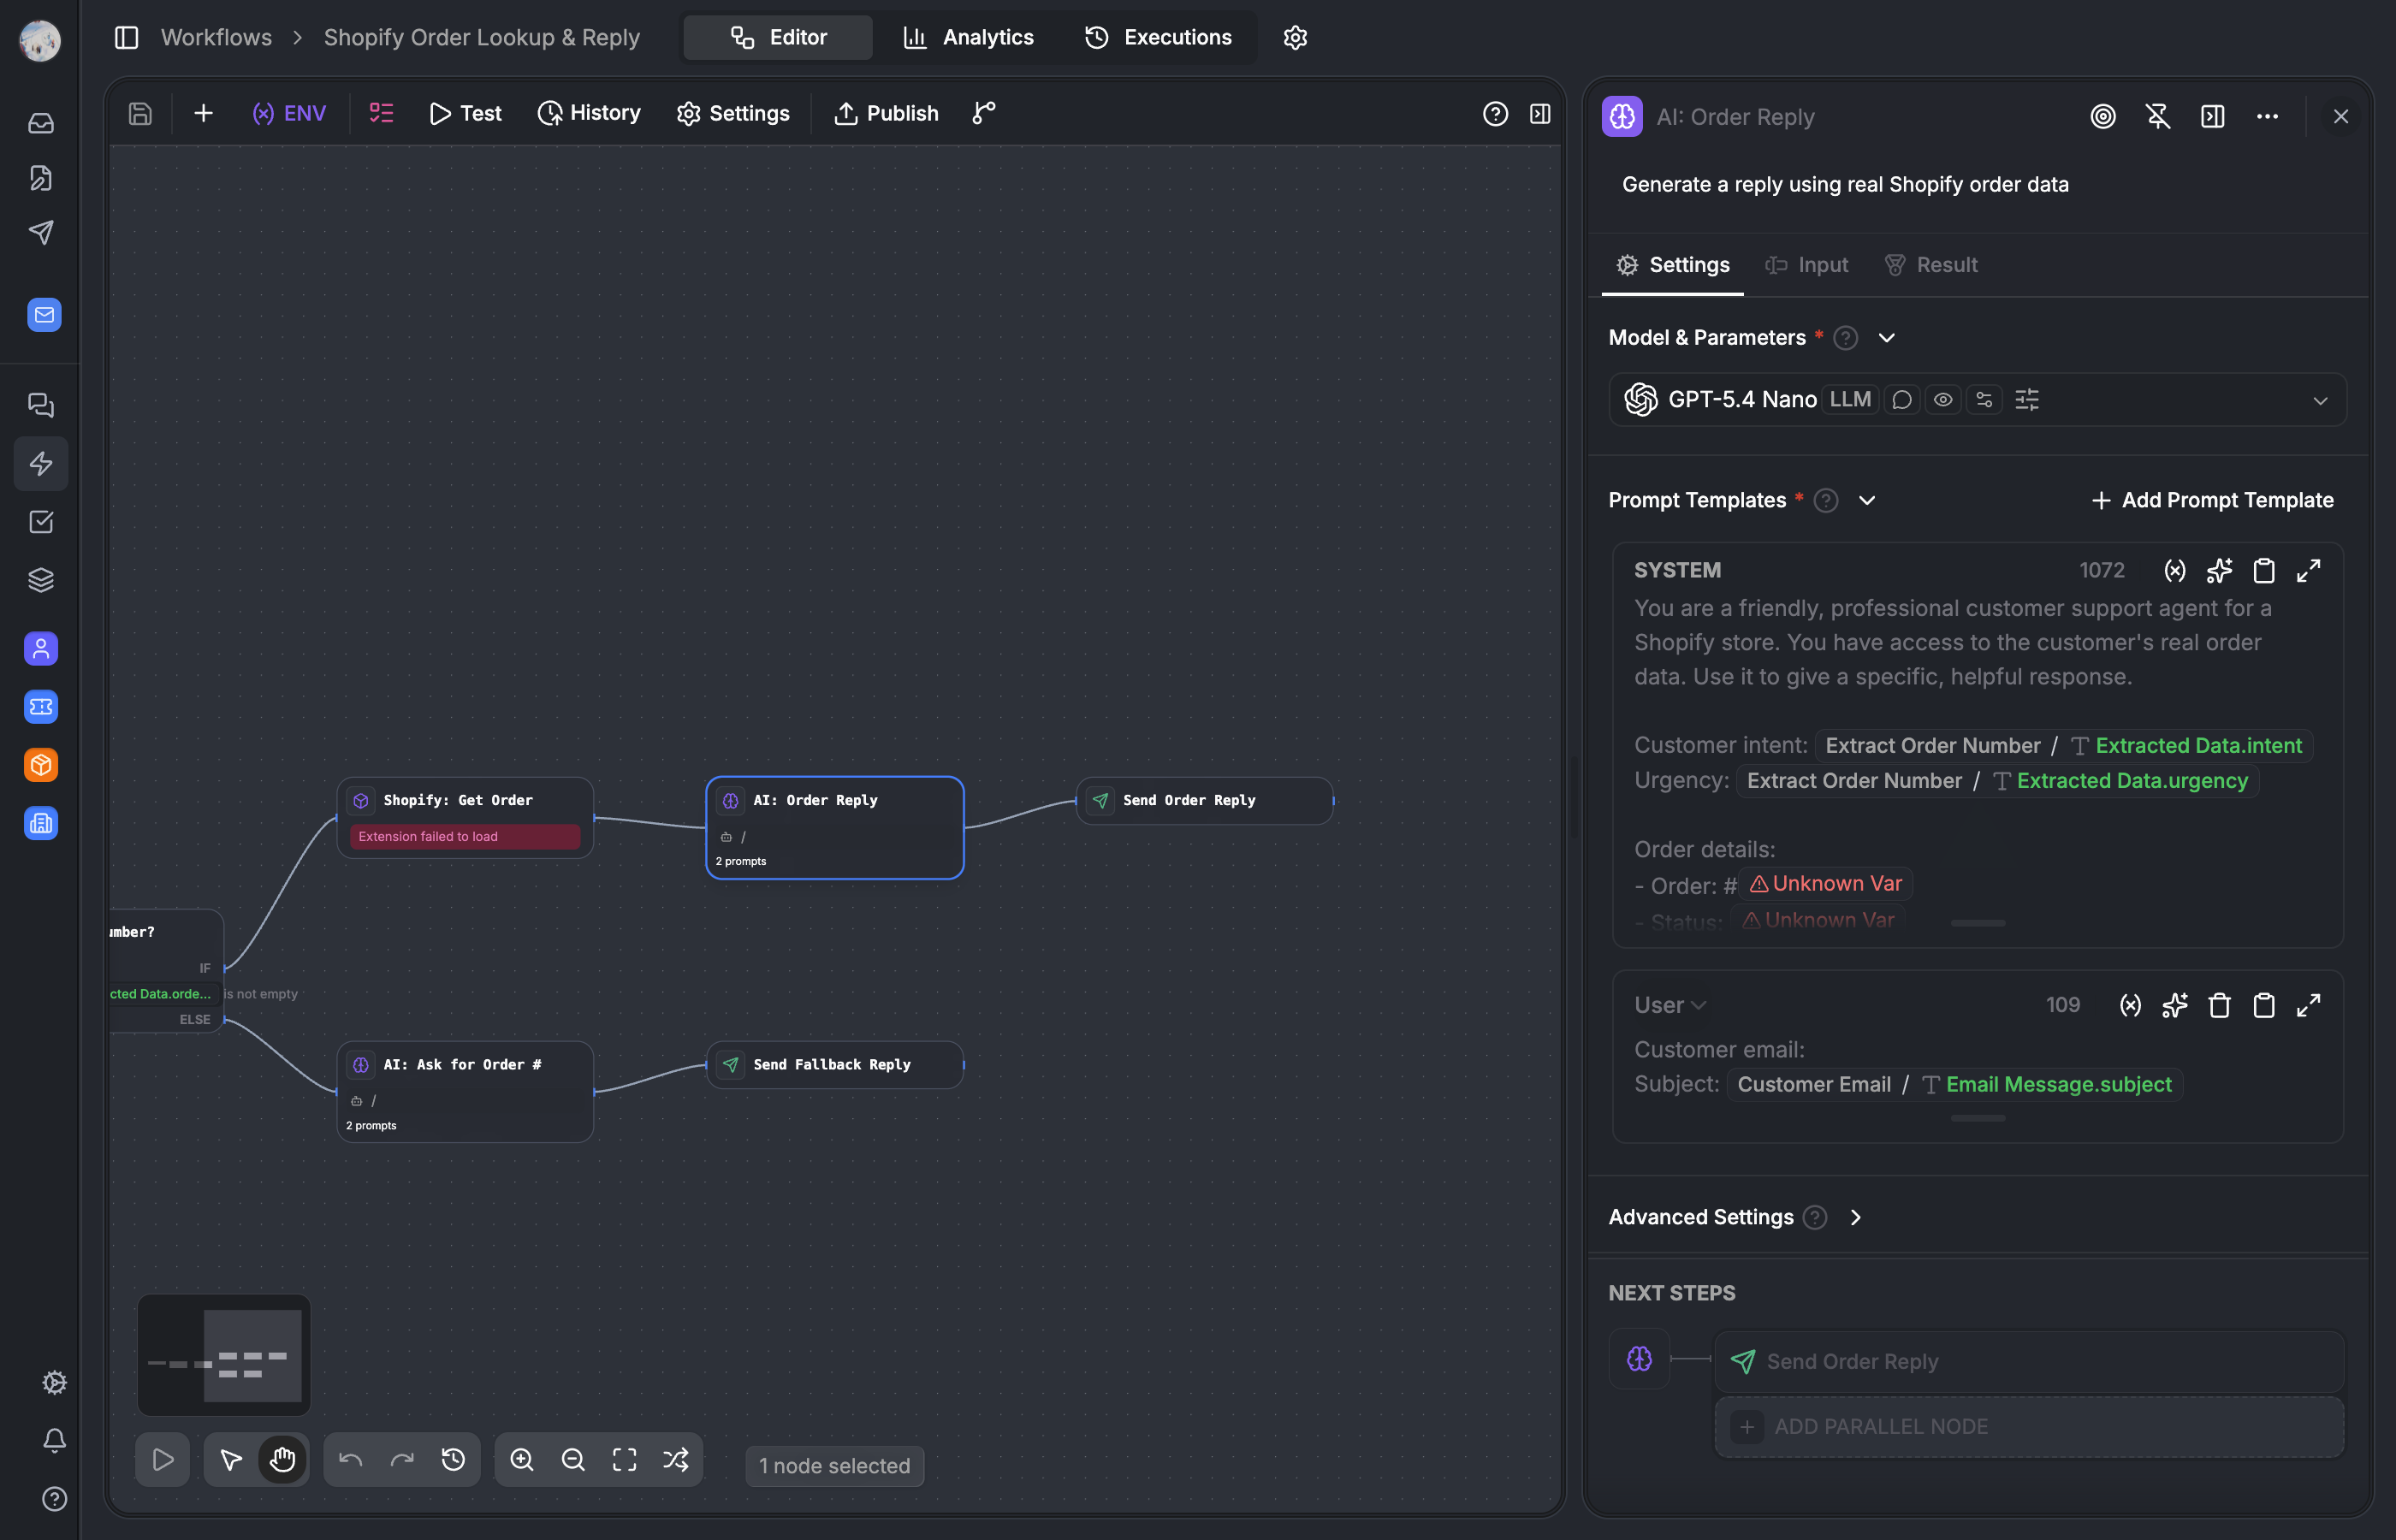
Tool use — workflow nodes as LLM tools
This is the feature that turns workflows from static pipelines into dynamic agents. The idea: instead of defining tools separately and wiring them to the AI node, we reuse the workflow nodes themselves.
A find node that queries customers becomes a find_customers tool the AI can call. An http node configured to hit a shipping API becomes a check_shipping_status tool. The nodes existing config — entity type, filters, URL, headers — becomes the tools parameter schema.
The tool registry
// packages/lib/src/workflow-engine/core/tool-registry.ts

// which node types can become tools
const TOOL_ELIGIBLE_TYPES = [
  'HTTP', 'CRUD', 'FIND', 'TEXT_CLASSIFIER',
  'INFORMATION_EXTRACTOR', 'VAR_ASSIGN', 'CODE', 'DATE_TIME'
]

// always available regardless of mode
const BUILT_IN_TOOLS = ['http_request', 'assign_variable']
ToolRegistry scans the workflow graph for nodes of eligible types. Each node is converted into a tool definition with:
- A sanitized function name (max 64 characters, OpenAI-compatible) derived from the node title
- A description from the nodes title and config
- An input/output schema generated from the nodes configuration
The AI nodes tools.mode config determines which tools are available:
workflow_nodes— only other nodes in the same workflowbuilt_in— only the built-inhttp_requestandassign_variabletoolsboth— all of the above
How tool execution works
When the LLM returns a tool call:
AIV2ToolExecutorreceives the tool call from the LLM response- It routes to
ToolExecutionManager.executeTool(), which looks up the target node in the workflow graph - The target nodes processor is invoked in the current
ExecutionContextManager— the same variable scope as the AI node - The tools output is returned to the LLM as a tool result
- The LLM can call more tools or produce a final response
// packages/lib/src/workflow-engine/core/tool-execution-manager.ts

async executeTool(
  toolCall: ToolCall,
  graph: WorkflowGraph,
  contextManager: ExecutionContextManager,
): Promise<ToolResult> {
  const targetNode = graph.findNodeByToolName(toolCall.function.name)
  const processor = this.nodeProcessorRegistry.get(targetNode.data.type)

  // execute the target node in the same context
  const result = await processor.execute(targetNode, contextManager, {
    inputs: toolCall.function.arguments,
  })

  return {
    tool_call_id: toolCall.id,
    content: JSON.stringify(result.outputs),
  }
}
The critical design decision here is shared execution context. When the AI calls a tool, the tool-node executes in the same ExecutionContextManager. Its output becomes a node variable that downstream nodes can reference with {{toolNodeId.output}}. The agent doesnt exist in a silo — its part of the workflow graph.
This means you can build a workflow like:
Trigger → AI node (with tools) → CRUD node (uses AI output) → End
                ↑
                └── calls find node as tool
                └── calls http node as tool
The AI node decides dynamically which tools to call. The find and http nodes execute in-context. Their outputs are available to both the AI (for further reasoning) and to downstream nodes (for further processing). One graph, one execution context, no data marshaling.
Provider-agnostic tool schemas
generateToolsSchema() outputs either OpenAI or Anthropic format depending on the model provider. The processor doesnt know which format — the orchestrator handles the translation.
// packages/lib/src/workflow-engine/core/tool-registry.ts

generateToolsSchema(format: 'openai' | 'anthropic'): ToolDefinition[] {
  return this.tools.map((tool) => {
    if (format === 'openai') {
      return { type: 'function', function: { name: tool.name, ... } }
    }
    return { name: tool.name, input_schema: tool.schema, ... }
  })
}
Function names are sanitized to max 64 characters with only alphanumeric characters and underscores — the strictest common denominator across providers.
AI-powered transform nodes
Two node types use the same LLM infrastructure but with different output contracts.
Text classifier
The text classifier is an AI node whose output is an edge handle — it uses the LLM to pick a branch.
// packages/lib/src/workflow-engine/processors/text-classifier.ts

class TextClassifierProcessor extends BaseAiNodeProcessor {
  async buildMessages(node, context): Promise<Message[]> {
    // build a system prompt describing the categories:
    // "Classify the following text into one of these categories:
    //  - billing_issue: Questions about invoices, payments, refunds
    //  - shipping_inquiry: Questions about delivery, tracking
    //  - product_question: Questions about product features, compatibility"
    return [
      { role: 'system', content: classificationPrompt },
      { role: 'user', content: inputText },
    ]
  }

  async handleResponse(response, node, context): Promise<NodeResult> {
    const category = parseClassification(response.content)
    return {
      outputs: { classification: category },
      outputHandle: category,  // this determines which branch to take
    }
  }
}
The outputHandle is the key. When getNextNodeIds() looks up the next nodes after a text classifier, it uses edgesBySourceHandle to find the edge matching the classification result. The workflow branches based on what the AI decided.
In the editor, this looks like an if-else node with AI-powered conditions. You define the categories (billing, shipping, product question) and the AI routes the input to the right branch. No manual condition rules, no keyword matching — the LLM understands intent.
Information extractor
The information extractor uses the LLM to pull structured data from unstructured input.
// packages/lib/src/workflow-engine/processors/information-extractor.ts

class InformationExtractorProcessor extends BaseAiNodeProcessor {
  async buildMessages(node, context): Promise<Message[]> {
    // "Extract the following fields from the text:
    //  - customer_name (string, required)
    //  - order_number (string, optional)
    //  - issue_type (enum: refund, exchange, complaint)"
    return [
      { role: 'system', content: extractionPrompt },
      { role: 'user', content: inputText },
    ]
  }

  async handleResponse(response, node, context): Promise<NodeResult> {
    const extracted = JSON.parse(response.content)
    // validate against the target schema
    return { outputs: extracted }
  }
}
The output is structured data — validated JSON that downstream nodes can reference field by field. A common pattern: extract customer info from an email → use the extracted order number in a find node → use the extracted issue type in an if-else for routing.
Knowledge retrieval — native RAG
The knowledge retrieval node queries a vector database (pgvector) against user-uploaded datasets.
// packages/lib/src/workflow-engine/processors/knowledge-retrieval.ts

class KnowledgeRetrievalProcessor {
  async execute(node, context): Promise<NodeResult> {
    const query = resolveVariable(node.data.config.query, context)
    const datasetId = node.data.config.datasetId

    // vector search — embed query, find nearest chunks
    const results = await this.vectorSearch(query, datasetId, {
      topK: node.data.config.topK || 5,
      scoreThreshold: node.data.config.scoreThreshold || 0.7,
    })

    return {
      outputs: {
        results: results.chunks,
        scores: results.scores,
      },
    }
  }
}
The typical pattern is retrieval-augmented generation: knowledge retrieval → AI node with {{retrieval.results}} injected into the prompt. The AI gets relevant context from the organizations own documents without needing to fine-tune a model.
The query is usually the users message or a variable from a previous node. The dataset is a collection of documents that the organization has uploaded and chunked. The chunking itself is handled by the document-extractor and chunker nodes, which can also be part of a workflow (e.g., a workflow that processes new documents as theyre uploaded).
Public workflows — three distribution channels
A workflow isnt just an internal automation. It can be published as an API endpoint, a web form, or triggered by external events.
// packages/database/src/db/schema/workflow-app.ts

export const WorkflowApp = pgTable('workflow_app', {
  // ... id, name, organization

  webEnabled: boolean(),           // accessible as a web form
  apiEnabled: boolean(),           // accessible as an API endpoint
  accessMode: varchar(),           // 'public' | 'organization'
  shareToken: varchar(),           // unique token for public URLs
  config: jsonb(),                 // branding, custom CSS
  rateLimit: jsonb(),              // per-workflow rate limit config
})
API endpoint
When apiEnabled is true, the workflow is callable via POST /api/v1/workflows/{shareToken}/run with a JSON body matching the triggers input schema. The response is either synchronous (wait for completion and return outputs) or streamed (SSE events for each node execution).
The input schema is defined by the trigger node. A webhook trigger expects whatever payload the external system sends. A manual trigger expects the record ID. A form trigger expects the form fields.
Web form
When webEnabled is true, the workflow renders as a standalone form at a public URL. This is where the "non-executable" input nodes from Part 1 come into play.
form-input, number-input, and file-upload nodes are skipped by the engine — theyre metadata. But they define the form fields when the workflow is published as a web form. Each input node becomes a field in the form UI. The answer nodes output becomes the response shown to the end user after the workflow completes.
The same graph serves both the automation engine and the form renderer. No separate form definition.
Share token, not workflow ID
Public URLs use a rotatable share token, not the internal workflow ID. This means:
- The internal ID is never exposed in URLs
- Revoking access is a token rotation —
generateShareTokencreates a new one, old URLs stop working - You can share a workflow URL externally without leaking internal identifiers
// apps/web/src/server/api/routers/workflow.ts

generateShareToken: protectedProcedure
  .input(z.object({ workflowAppId: z.string() }))
  .mutation(async ({ ctx, input }) => {
    const token = generateId('wf')
    await ctx.db.update(WorkflowApp)
      .set({ shareToken: token })
      .where(eq(WorkflowApp.id, input.workflowAppId))
    return { shareToken: token }
  }),

revokeShareToken: protectedProcedure
  .input(z.object({ workflowAppId: z.string() }))
  .mutation(async ({ ctx, input }) => {
    await ctx.db.update(WorkflowApp)
      .set({
        shareToken: null,
        webEnabled: false,
        apiEnabled: false,
      })
      .where(eq(WorkflowApp.id, input.workflowAppId))
  }),
Revoking disables both web and API access in one operation. No dangling endpoints.
Rate limiting
Each workflow app can configure its own rate limit. The implementation is a Redis sliding window (INCR + PEXPIRE) checked before execution starts. As covered in Part 2, it fails open — if Redis goes down, workflows still execute.
Rate limits can be scoped per-workflow or per-user (for authenticated public workflows). This prevents a single public workflow from consuming all resources, and prevents individual users from abusing a public endpoint.
Templates — portable workflow definitions
Templates are pre-built workflows that users can instantiate with one click. The challenge: templates need to be organization-agnostic, but workflows reference org-specific resources (app installations, entity definitions, custom fields).
// packages/database/src/db/schema/workflow-template.ts

export const WorkflowTemplate = pgTable('workflow_template', {
  id: cuid(),
  name: varchar(),
  description: varchar(),
  categories: jsonb(),             // string[] for gallery filtering
  icon: jsonb(),

  graph: jsonb(),                  // uses portable references, not org IDs
  requiredApps: jsonb(),           // [{ appSlug: 'shopify', blockIds: [...] }]
  requiredEntities: jsonb(),       // [{ slug: 'order', type: 'entity_definition' }]

  status: varchar(),               // 'public' | 'private'
  popularity: integer(),           // sort order in the gallery
})
The solution is portable references. Template graphs use @slug:blockId notation instead of UUIDs:
{
  "type": "standard",
  "data": {
    "type": "@shopify:order_created",
    "entityDefinitionId": "@entity:order"
  }
}
When a user instantiates a template, the workflow.create mutation resolves these slugs to the organizations actual IDs:
@shopify:order_created→ looks up the Shopify app installation → resolves to the actualappInstallationId:blockId@entity:order→ looks up the entity definition withapiSlug: 'order'→ resolves to the actualentityDefinitionId
If a required app isnt installed, the UI shows "This template requires the Shopify app. Install it first." The requiredApps and requiredEntities arrays enable this pre-flight check.
Templates are super-admin managed — global to the platform, no organizationId. The popularity field controls sort order in the template gallery. This is a simple integer, not a computed metric — we manually boost templates that we think are most useful.
Versioning
Every publish creates a new Workflow row with an incremented version number:
Draft workflow (always editable)
  ↓ publish
Version 1 (frozen) ← workflowId points here
  ↓ edit draft, publish again
Version 2 (frozen) ← workflowId now points here
  ↓ ...
WorkflowApp.workflowId always points to the latest published version — the one that runs when triggered. Old versions are retained. Users can list them via the version history popover, view any version in read-only mode, rename versions ("v3 — added Shopify lookup"), and delete non-active versions.
Crucially, WorkflowRun.graph snapshots the executed graph independently of the version system. Even if all old versions are deleted, the run records preserve exactly what was executed. The version system is for the workflow author. The run snapshots are for audit and debugging.
The full loop
Heres how everything composes in a real workflow:
1. Shopify webhook fires → "order created"
2. Resource trigger captures the event, injects order data into context
3. Find node queries the customer record by email
4. If-else checks: is the order value over $500?
   ├── Yes → AI node with tool use enabled
   │         AI reads order + customer data from context
   │         AI calls find_recent_orders tool (→ find node executes in-context)
   │         AI calls check_shipping_status tool (→ http node executes in-context)
   │         AI composes a personalized VIP response using all the context
   │         → Answer node sends the reply
   └── No  → Text classifier routes by issue type
             ├── billing → Template reply about billing
             ├── shipping → AI node with tracking info in prompt
             └── general → Standard auto-reply
5. CRUD node updates the ticket status
6. End
The editor (Part 1) lets you visually compose this graph. The engine (Part 2) executes it with parallel branches, pause/resume, and real-time streaming. The AI layer (this post) gives the AI node the ability to dynamically call other nodes as tools. And the distribution layer lets you expose the same graph as a public API, a web form, or an internal automation.
One graph. One execution model. Multiple distribution channels.
Key trade-offs
| Decision | Trade-off | Why we chose it |
|---|---|---|
| Workflow nodes as tools | Tighter coupling between graph and tool definitions | No duplicate configuration — the node IS the tool |
| Shared execution context for tool calls | Tool-called nodes affect the parent context | Enables downstream nodes to reference tool outputs naturally |
Template portable references (@slug:blockId) | Resolution complexity at instantiation | Org-agnostic templates that work in any organization |
| Non-executable input nodes | Two interpretations of the same node type | Same graph serves engine (skip) and form renderer (render) |
| Share token over workflow ID | Token rotation breaks existing URLs | Internal IDs never exposed, revocation is clean |
| Text classifier as branching | Uses LLM tokens for every routing decision | Intent-based routing without manual keyword rules |
| Base class template method for AI nodes | Inheritance hierarchy | Adding new AI node types is: implement buildMessages() + handleResponse() |
Wrapping up the series
Across three posts, weve covered:
- Part 1: The visual editor — React Flow, 30+ node types, 12 Zustand stores, snapshot-based undo, debounced auto-save
- Part 2: The execution engine — while-loop executor, parallel branches with isolated contexts, pause/resume via state serialization, real-time streaming via Redis pub/sub
- Part 3 (this post): AI nodes with tool use, knowledge retrieval, public workflows, templates, and versioning
The workflow system is the backbone of Auxx.ai. Every automation a customer builds — from simple email routing to complex AI-powered support flows — runs through this stack. The editor, engine, and AI layer are all open-source. If youre building something similar, check out the repository and feel free to dig through the code.